
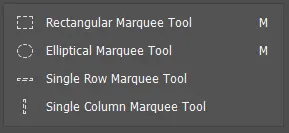
The tools you see in the following figure are geometry selection tools. Another of the most useful tools in Photoshop software is the Select tool. I intend to choose to make separate edits to a part of the image.
These changes can include color change, transfer, restore, remove, resize, and more. The important thing here is how to select the desired area.
This section of the Select tool is only a limited part of the Select tool in the software. In this section you can only have selections with geometric shapes. These tools are also known as branded tools.
For starters, the question may be: why isn't there a triangular geometric shape in this section?
The answer to this question is very simple. The purpose of working with Photoshop software is to make our graphics as quickly as possible. There is a simpler tool for selecting triangle shapes in Photoshop, which I will explore in future sections.
tool for selecting a rectangular area
You can use this tool to select square shapes. If you hold down the Shift key while working with this tool, your choices will be square.
A very useful thing for beginners is that if you want to delete the selected environment for any reason, use the "ctrl + d" keys. If we hold down the "space" key while selecting an environment, we can move the selected environment.
Note that if you want to move "Select", you shouldn't take your hand off the mouse. Also, after selecting a section, you can move it with the arrow keys.
Well, for this tool, there are four modes in the "options bar" section, which include the following modes:
new selection: this is the normal selection mode.
add to selection: this tool adds a new area to the previous Select environment.
subtract from selection: this tool removes a new area from the previous Select environment.
intersect with selection: this tool selects a new and an old selection area.
Well, usually very few professionals use these options above. This is because when you do a "Select", you can do all of these things using the combination keys.
In "Select", you can add a new area to the previous environment by pressing the "Shift" key. If you notice, when you hold down Shift, a "+" sign appears next to the mouse indicating "add to selection".
If you hold down the "Alt" key, the selected environment will be removed from the previous environment. This is actually the "subtract from selection" option. If you are careful, holding down the "Alt" key will display a "-" sign next to the mouse.
Finally, if you hold down the key combination "Alt + Shift", your shared area will be selected. In effect, this is the "intersect with selection" option.
Elliptical Marquee Tool
This tool is similar to the Rectangular Marquee tool, except for circular selections. Everything I said above for the Rectangular Marquee tool applies to this tool as well.
By holding down the "Shift" button, all selected shapes are circular. That is, the length and width of the selections are the same. Well, in the "options bar" you have a variable called "Feather".
Well, as the name suggests, the task is to try. People who do lengthy and editing jobs are familiar with the concept. When making circular selections, try setting this variable to a number other than zero.
Set this number to zero pixels if you want to make square or angled selections. In fact, any number you choose equals the amount of pixels at a time. Indeed, the application of this section is experimental.
In the "options bar" there is a "Style" section where you can set the ratio between the length and the width of the options. The "Elliptical Marquee" and "Rectangular Marquee" tools can be called "M".
This means that instead of activating them from the tools menu on the right, you can activate them by typing the letter "M" on your keyboard.
Single row selection tool
The Single Row Marquee Tool is actually the Rectangular Marquee Tool. The only difference is that the width of the selected rectangle is 1 pixel. Indeed, this tool selects for you a one-pixel line along the horizon.
Single column selection tool
This tool helps you to select a vertical line. As I explained above, you can use the arrow keys to move your selection.
Keep in mind that wherever you use the arrow keys to move, there are two things to keep in mind:
First, each time you press a navigation key, only one pixel of the navigation operation is performed.
If you hold down "Shift" while moving, you will move 10 pixels each time you press the arrow keys.
Well, the "Single Column Selection Tool" was the last tool for selecting geometric shapes. The tools that I will present to you from now on are not geometric.